Showing posts with label jewellery. Show all posts

03/09/2024

B for Bird - a guest project for GelliArts


Hi there! Today I have something exciting to share! If you follow me on Instagram, you probably know this already, but I'm participating to Gelli Arts's ABC Printing Challenge as a guest! A was for animals and yesterday B was for birds and my two crow earrings were shown! You can see all the challenge letters here (link) in Gelli Arts Instagram post.

This opportunity actually came via my friend Marsha Valk (link). She named me a couple of letters and I was immediately inspired by a couple of them. This B was one of those and I was jumping with joy as I got it! I mean, of course I could have just done it taking part of the challenge, too, but I felt really happy to be able to make a Reel for Gelli Arts. 

So, if you want to see how I made these gel printed earrings, please head over to Instagram! They were a bit trial and error, as the shrink plastic proved to be a bit more challenging surface to print on than absorbing paper! Makes total sense now, but... If I'd do these earrings now again, I probably would make less layers to the print. Maybe just adding the paint markers doodles to the plate and then already pulling the print. That way the pattern might transfer better to plastic and after shrinking the surface wouldn't be so bubbly. Although I have to say that I quite like both - the weathered looking print as it's not perfect AND the slightly textured surface!

If you have any questions about these, please let me know! Have a great start to the week and happy printing!


Materials: Gelli Arts, CC Hobby, PaperArtsy, Posca

02/07/2024

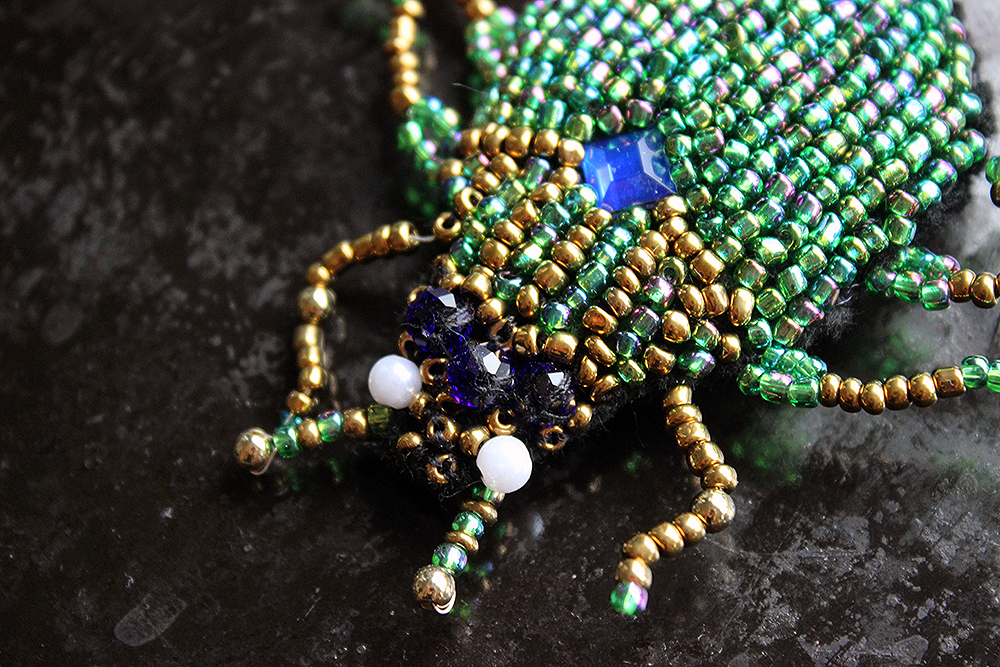
Jewel bugs


Hello there! Today I also share something a bit different - like last week with the wands. Like those, these are also something I initially made for work as samples. 

These are little hand sewn jewel beetle brooches. The bigger rhinestones are glued in place but the seed beads are sewn in place. The bugs are done on top of craft felt, then cut to the right size, stuffed and the legs and antennae added. They are no mixed media, but still were fun to do! 

Thank you for stopping by today! Wishing you a lovely day!


19/04/2023

Rococo brooch - PaperArtsy


Hello there and nice Wednesday! Today I have something a bit different for you - some rococo brooches! These are created for PaperArtsy and go with the current "Mail Art" theme. You can see the theme post here in PaperArtsy's blog (link).

I pitched for a few projects within this theme, but I'm really happy that this one was chosen! I love to do something different every now and then and an assignment gets me there better than if I just craft on my own. You know how easy it is to get stuck in your known groove? Although I must say, that these were partly in my zone, too, as I've used the wooden buttons as a base before. They are really handy for jewelry bases and I love the little dome they have. 

I would sometimes love to really track how my mind works as it jumped quite quickly from the postage stamps in jewelry to rococo color scheme. Like I write in the PaperArtsy blog post (link), rococo women's wear is a period I studied while writing my thesis. It's also been a visual candy for me since childhood, which is quite fun as I've never been into frills and white cascading lace in my own style. But somehow still my mind immediately jumped from the postage stamps to pale peach and smoky blue colors and I then followed that train of thought. 

If you wish to see a step by step version how I made the brooches, please head over to PaperArtsy blog (link). I've also tried to open my process a bit there even though I'm not always totally sure myself how my brain makes the creative leaps! You can also find the materials in the post, linked in the text.

Thank you so much for stopping by today! Wishing you a fine day!


Materials: PaperArtsy, Ranger, Prima Marketing, Sinelli, Eurokangas


25/01/2023

Runic pendant - PaperArtsy


Hiya! Yesterday I shared a bunch of boxes I made for PaperArtsy using Finnish mythology as my jumping off point. In the PaperArtsy post (link) I also shared this little pendant. It's done similarly to those stamped stone faces on top of the boxes. I just added a hole to the polymer clay before baking. If you wish to see, how I made the faces, please head over to PaperArtsy as I have a step by step tutorial for the boxes there. And like I said, this pendant is done similarly! 

Thank you for stopping by today! Have a great day!

01/02/2021

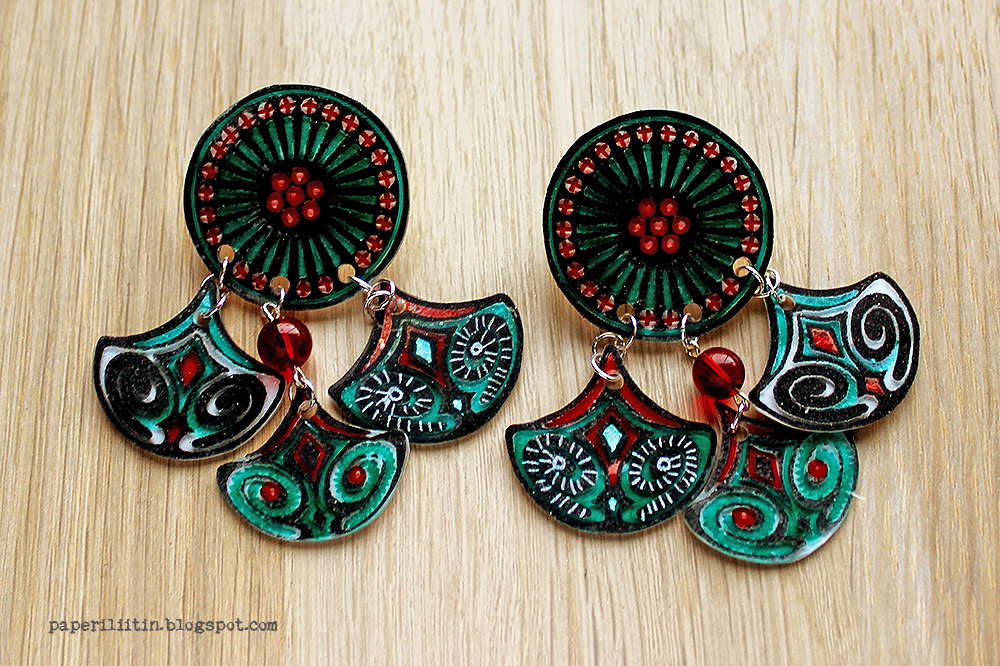
Shrink plastic earrings - GDT Nathalie Kalbach


Happy Monday! Today I'm sharing a guest project. These earrings were made as a guest for Nathalie Kalbach. You can see the original post here (link) at Nathalie's blog. I actually made a couple of projects so you'll see a couple more during the next weeks. 

As my first go I made some jewelry pieces. I really love the patterns of the foam stamps and love how satisfying it is to stamp with them, but on their own they are maybe a touch too big to be used as jewelry. As a pendant, maybe, but as I’m more into earrings the images seemed a bit too big. But no worries, I can always use shrink plastic! That way I’m getting the pattern and the feel of the foam stamp, but the finished piece is half the size! So satisfying! 


For these three pairs of earrings, I used both white and black shrink plastic. I used acrylic paint to stamp the images and then colored them using alcohol and paint markers. The first pair is made using both the “Groove Street” and the “Fairview Fan” stamp set. The circular piece has an earring stud at the back. The dangly parts are made using both positive and negative version of the fan stamp set. To make the center fan a little bit longer than the other two I added a red glass bead between the circle and the fan. 


The second pair has even more glass beads as there’s just the fans that are stamped. Again, there’s a stud piece at the back. The last, but not least, is maybe my favorite. I made that using the “Groove Street” stamp, just alternated the color I was using on top of black shrink plastic. The first one is done with inky blue metallic acrylic paint, the second one pale blue metallic acrylic and the one nearest to the ear is then white acrylic paint. These dangle all the way as I added a stud earring with a little ring on top. 

I’m not a jewelry maker but these were so easy to do even I managed them! Now the only trouble is to decide which pair to use! 

Thank you for stopping by today! Wishing you a fun, artsy week! 


Materials: 

CCHobby: Shrink plastic in white and black
CCHobby: Stud earring parts + loops + pins
Prima Marketing: Heavy gesso black + white 
Prima Marketing: Art Alchemy acrylic paint Metallique Ice Queen, Midnight Sky
Sizzix: alcohol markers
Posca: paint markers 
Glass beads 
Super glue


14/10/2020

Stamped brooches - Julie Hickey Designs


Moikka! Today I'm sharing two little brooches I made using stamps by Julie Hickey Designs. They both come from the same set called "Floral Frames". 

I first stamped the designs using Archival Ink to a piece of tissue paper. I then colored the pieces using water-based markers. I colored two wooden buttons using acrylic paints and after the paint layer was dry, I added some soft-body gel medium on top and collaged the trimmed stamped piece on top. The markers hold quite nicely without bleeding even though I was a bit worried about it! 

I added another layer of the gel on top, sealing the tissue paper with it. On top I added a little word, cut from an old book. Then I just glued the brooch part to the back and the buttons were done! The white markings on the brooches are made using Posca markers. 

Thank you for stopping by today! Wishing you a wonderful Wednesday! 


Materials: Julie Hickey Designs, Prima Marketing, Sinelli, Posca, Ranger


13/08/2020

Self - Finnabair Brand Ambassador Spotlight


Hiya! Today I'm sharing something I created for the Brand Ambassador Spotlight at Finnabair's blog. This time the host is Linda M. Cain and theme is to use vintage photos and Mechanicals in the project. You can see the original post here (link). Please go and see how the other's have interpret the subject - Linda herself, Kassa Hayselden and Reniferove.

Both of the inspiration elements for the project are something I use quite often. I love Mechanicals in all their shapes and sizes. If I see old photos on a flea market I usually tend to buy those, but they are my treasures and I seldom use them in my makes. Instead I go for the Art Daily stickers or some other re-produced vintage photos. 

As the elements are something I usually steer towards in my makes, I wanted to do something a bit different this time. As I usually adhere Mechanicals on a canvas or altered project, this time I wanted them to be the highlight and did a piece of jewelry out of them. I mixed in some glass pearls as well. 

I’m not totally sure how well you can spot the vintage photo from the pictures here. But there’s a tiny vintage lady inside the pocket watch piece. I glazed her over using big grained embossing powder.

Thank you for stopping by today! 


Materials: 

Mechanicals Pocket Watches 


Materials: Prima Marketing, WOW! Embossing Powder, Sinelli


16/07/2020

Go Dutch! earrings - GDT Art by Marlene


Moikka again! Today I have a little more "Go Dutch" inspiration for you! Yesterday I shared a journal page, which I'm recreating this Sunday on a Facebook live, but today I have something smaller. It's a pair of earrings I did using the collection. 

The base of the earrings is thick cardboard - actually from a coaster. I cut the pieces using a Sizzix Bigz die (Fruit Shapes 663855) and then painted them yellow and red using just acrylic paints. The face is from one of the "Go Dutch" stamp sets and the tulips from the other. I stamped them on top of white cardstock, colored using brush tip markers and added whites with a Posca marker. Then I added the stamped images to chipboard shapes and coated the pieces using clear nail polish for more durability. 


These were so fun to make and they are super light! I'm not expecting them to last forever because of the base material, but I'm sure they will endure some use. I also find it funny, that after I had assembled the earrings they seemed to resemble matryoshka dolls! I was going for a "girl with a tulip dress" kind of look, but probably the shapes and colors then got me thinking matryoshka. I used to have one with yellow scarf and red dress when I was a child. And that's all fine! 

Thank you for stopping by today! Have a colorful Thursday! 


Materials: Studio Light, Prima Marketing, Ranger, Creativ Company, Sinelli, Posca


Related Posts Plugin for WordPress, Blogger...