Showing posts with label Elizabeth Craft Designs. Show all posts

05/12/2017

Happiness - GDT Elizabeth Craft Designs


Hello there! Yesterday I shared some ATCs and today the layout, like promised. The both projects are done for Elizabeth Craft Designs and were blogged some time ago in my last GDT post. You can see that post, with a step by step tutorial to the ATCs, here (link).

I used the same steps as I made the ATCs I showd yesterday to make this layout. I changed the papers I used in the first step a little - adding the pink script first and then cut the rectangle piece with the postage stamp edge out of pink peach paper, but the next steps are the same - I added the candy swirls and the stars. There's also the white splashes and drawn edge, but this time I didn't ink the edge of the whole project. However, I did ink the edges of the stamped sentiment like in the cards. As for the focal point, that needs to be the photo, so the lollipops are used in the layout as embellishments.


The page is about my younger daughter's birthday party just last month. Normally it takes me ages to get the photos printed but this time I used an Instax camera to snap a picture of the table and could document the event almost immediately. Needed to wait the guests to leave first, though, ha ha. Usually my kids have had a themed party but this time it was otherwise - my daughter wanted to invite her friends to a local aquarium so the birthday party we had at home was just for relatives, adults, so we didn't have a theme.

Thank you so much for stopping by today! Have a sparkling, happy day! 


Materials from Elizabeth Craft Designs:


Other supplies:
Prima Marketing - Heavy Gesso, white
Prima Marketing - Water Soluble Oil Pastels
Wow Embossing Powder - Embossing Ink
Wow Embossing Powder - Coral Reef Embossing Glitter
Ranger - Distress Ink Picked Raspberries
Ranger - Archival Ink Jet Black
A Flair for Buttons - More Cameras flair buttons
paper doily
half pearls
white marker


Materials: Elizabeth Craft Designs, Wow Embossing Powder, Prima Marketing, Ranger, A Flair for Buttons

04/12/2017

Lollipop ATCs - GDT Elizabeth Craft Designs


Moikka and happy Monday! These candy ATCs are part of my last GDT post for Elizabeth Craft Designs! It has been a great ride and I have loved working with the dies and other supplies! My favorites are the new patterned papers and the great stamp sets, so I'm definitely going to continue using those in my makes in the future!

For the last post I made some sweet makes with the Lollypop die set. I made some candy ATCs, which you can see here and then a layout. If you want to see the layout already, please visit the Elizabeth Craft Designs blog (link) as I'll share the page tomorrow. 


The idea for these makes or rather the color palette I used in these came from the two papers you can see mixed in the first lollipop above - the minty green polka dot and the pink solid paper. They are something I wouldn't have thought of combining otherwise but as they lay on top of each other when I was going through the supplies in search for an idea for the last post, I noticed how good they looked! And I started to think about candies immediately so then the ball started to roll, so to say. I also mixed in some white to brighten the cards and the black stamping brings in the contrast.

I took some step photos while working on the ATCs. If you wish to see those, how I layered the different mediums in those and how the process went, please check the Elizabeth Craft Designs blog (link). As always, you can use the same steps to create something else as well - a regular card or a layout, like I did for my second project.

Please be back tomorrow for the layout with the same supplies! And thank you for visiting my blog today! Have a great day! 


Materials from Elizabeth Craft Designs:


Other supplies:
Prima Marketing - Heavy Gesso, white
Prima Marketing - Water Soluble Oil Pastels
Wow Embossing Powder - Embossing Ink
Wow Embossing Powder - Coral Reef Embossing Glitter
Ranger - Distress Ink Picked Raspberries
Ranger - Archival Ink Jet Black
A Flair for Buttons - More Cameras flair buttons
paper doily
half pearls
white marker


Materials: Elizabeth Craft Designs, Prima Marketing, Wow Embossing Powder, Ranger

16/11/2017

Believe - GDT Elizabeth Craft Designs


Hiya! Yesterday I shared a layout I did for Elizabeth Craft Designs as a guest project and today I'm sharing a card from the same post (link). I tend to do always two projects for the post with the same theme or steps. This time it was a wintery layout and this card.

I started by adhering a piece of patterned paper to the cardstock, then applied gesso and continued with Modeling Paste. The biggest difference between the two projects, except the size, is the use of thread in the card. If you wish to see how the card was made, please see the video below! 


I tried to capture snowy, wintery feel in the card so it could be used as a Christmas greeting or just a winter greeting card. With all the stars and sparkle, you could use this style even for a New Year's card!

Thank you for visiting today! I hope you like these projects and find inspiration from these! 


Materials from Elizabeth Craft Designs:


Other:

Prima Marketing - Heavy Gesso White
Prima Marketing - Modeling Paste
Prima Marketing - Soft Gloss Gel
Wow Embossing Powder - Embossing Ink
Wow Embossing Powder - Bright White Embossing Powder
Ranger - Archival Ink Jet Black
Prima Marketing - paper blooms
thread
stapler


Materials: Elizabeth Craft Designs, Prima Marketing, Ranger, Wow Embossing Powder


15/11/2017

Follow your dreams - GDT Elizabeth Craft Designs


Hi there! How are you? I've been ordered to take it easy as I've been coughing for a month now. Luckily it seems to do the trick as I feel much better!

What I'm sharing today is the first of two guest projects for a post at Elizabeth Craft Design's blog. You can see the post here (link). It's a double treat as there's this layout with a step by step tutorial and a card with video tutorial! Both of the projects are done with a winter theme or wibe. Both of the projects have blue, white, grey color scheme, white splashes and snowflakes. I also tried to add the winter wibe using Micro Fine Glitter as frost or twinkle of the snow.


This layout is about the last princess birthday my younger daughter had. It was almost two years ago. Since then she's gotten more into football and skateboarding. The Elsa dress I did for her for that 5th birthday fitted the winter theme well and she's also a child of winter.

I used the same steps or techniques in both the card and the layout. If you want to see the card, please come back tomorrow or visit the Elizabeth Craft Designs blog (link). There you can also find the step by step for the page in case you wish to see how it's made!

Thank you for stopping by today! All the best!


Materials from Elizabeth Craft Designs:


Other:

Prima Marketing - Heavy Gesso White
Prima Marketing - Modeling Paste
Prima Marketing - Soft Gloss Gel
Wow Embossing Powder - Embossing Ink
Wow Embossing Powder - Bright White Embossing Powder
Ranger - Archival Ink Jet Black
Prima Marketing - paper blooms
thread
stapler


Materials: Elizabeth Craft Design, Ranger, Prima Marketing, A Flair for Buttons

04/10/2017

Forrest Friends - GDT Elizabeth Craft Designs


Happy Wednesday to you! Yesterday I shared a card which I made to a GDT post at Elizabeth Craft Designs (link). Today I'm sharing a little set of ATCs which I made using the same steps and same stamps.

As you maybe know by now, that's the way I usually do the projects for my guest post. I usually do two different projects for a post and use the same techniques and steps in both makes. The cards have the same stenciled background, the inked trees and the colored animals. Everything is just in a smaller form! If you want to see the steps, please visit the original post in Elizabeth Craft Designs blog here (link).

Thank you for stopping by today! Wishing you a lovely, colorful autumn with these two projects!


Materials from Elizabeth Craft Designs:


Other:

Ranger - Archival Ink Jet Black
Ranger - Distress Ink Spiced Marmelade
Prima Marketing - Scenic Route and Spring and Autumn Watercolor Pencil Sets
Prima Marketing - Art Alchemy Metallique Acrylic Paint Fresh Orange
Cream cardstock
Pencil
White and black marker
Water brush
Foam dots


Materials: Elizabeth Craft Designs, Prima Marketing, Ranger

03/10/2017

Thankful - GDT Elizabeth Craft Designs


Hello and happy autumn! The end of last week and at the same time month was really sunny here in Finland but now it seems that autumn truly has begun. It's gloomy, windy and dark! Luckily we can craft with colors and thus move the cloudy weather away!

I had the honor to guest again in the Elizabeth Craft Designs blog (link). Like in my other guest posts,  I created two projects using the same idea. This time I made two types of cards. My first project, with the step by step tutorial, is this fall card and my other project is a set of two ATCs, which I will share tomorrow.


I just love the warm, bright colors of autumn! The flaming orange and red and the golden yellow. When I saw the stamp set "Woodland Pals" I just knew it would be a perfect match to the autumn palette! So that's how this project started.

These cards are special in a way as I didn't use as much mediums as I usually do in making them. Don't get me wrong, I still managed to mix several different mediums in the make, but they are a bit different from my usual style. Somehow the cute animals led me to another direction, demanding as much attention as possible! If you want to know how I made the card, please visit the Elizabeth Craft Designs blog for the step by step tutorial (link)!

Thank you for your visit today!

PS. Did you see the tiny pumpkin in the first picture? It's really easy to do! Just cut the "Bonbon Box" out of a sheet of orange cardstock, ink the edges and the inside. Then cut a couple of leaves from the green dotted cardstock using the "Big Triple Leaf" die and glue those and a piece of wire to the box. You have a cute little pumpkin you can give to a friend together with the card!


Materials from Elizabeth Craft Designs:


Other:

Ranger - Archival Ink Jet Black
Ranger - Distress Ink Spiced Marmelade
Prima Marketing - Scenic Route and Spring and Autumn Watercolor Pencil Sets
Prima Marketing - Art Alchemy Metallique Acrylic Paint Fresh Orange
Cream cardstock
Pencil
White and black marker
Water brush
Foam dots


Materials: Elizabeth Craft Designs, Prima Marketing, Ranger

16/09/2017

Star - GDT Elizabeth Craft Design


Hello again! Like I said yesterday, today I'm sharing a card made using the same idea and steps that I used to make a layout I blogged yesterday. If you want to see the steps, please visit the original guest post in Elizabeth Craft Designs's blog here (link). The eight easy steps take you through creating the layout, but as you can see, the same steps can be used to make a card, too. Naturally they may need some editing, like adding a photo or writing the journaling, but you can still make similar background, the same clothes line and decorate with sequins.


The background in this card is made the same way although I used patterned pattern instead of the solid one. There's the gesso, the mist and the stenciled layers. There's also the stamped texture using the sayings stamp and the splashes and sequins. Naturally the smaller surface means a bit less space to work with the background layers, but you can still use the same ideas. You can also add the personal part in the card as you can write the greeting to the card yourself.

Thank you for stopping by today! Wishing you a lovely Saturday! 


Materials from Elizabeth Craft Designs:


Other:

Prima Marketing - White Heavy Gesso
Prima Marketing - Sugar Plum mist
Ranger - Distress Ink Seedless Preserves
Prima Marketing - Modeling Paste
Ranger - Archival Ink Jet Black
Prima Marketing - Art Alchemy Metallique Crocus Fields
American Crafts - Sketchbook Foam Thickers Journal White
Twine
Stapler
Sequins


Materials: Elizabeth Craft Design, Prima Marketing, Ranger

15/09/2017

Follow your style - GDT Elizabeth Craft Design


Happy autumn Friday! Today I'm sharing my first guest project for Elizabeth Craft Designs this month and tomorrow I shall reveal the other one. If you wish to see the both of them already, here's the link (link) to the original post in Elizabeth Craft Designs blog.

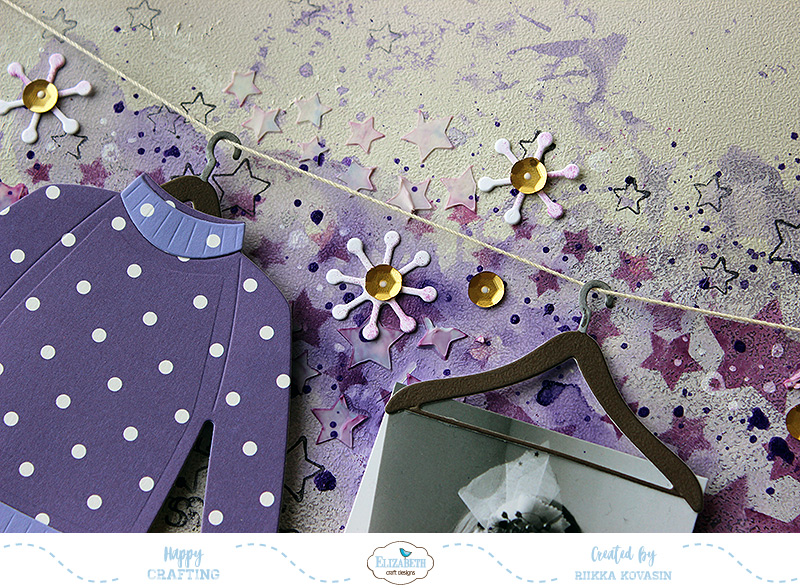
Autumn weather means jumpers need to be taken out of the closets so I thought to make a layout and a card using the fun jumper die from Joset's winter collection. I chose to use purple as my color palette this time in honor of the velvet nights autumn also brings.


This layout is about my daughters although there's just a picture of my older daughter in there. It always amazes me how they both have such a strong own style at such a young age. I mean I found my style when I was over 20! So I made the page to celebrate that they have their own style also in the hopes that it will stay that way when they grow up.

If you want to see how the layout was made, please follow this link (link) to the original post as you can find a step by step tutorial in there! And if you want to see how I turned the same steps or this layout into a card form, please come back tomorrow or scroll to the bottom of the original post.

Thank you for your visit today! Have a great start to the weekend and wishing you a lovely autumn day! Remember to stay warm! 


Materials from Elizabeth Craft Designs:


Other:

Prima Marketing - White Heavy Gesso
Prima Marketing - Sugar Plum mist
Ranger - Distress Ink Seedless Preserves
Prima Marketing - Modeling Paste
Ranger - Archival Ink Jet Black
Prima Marketing - Art Alchemy Metallique Crocus Fields
American Crafts - Sketchbook Foam Thickers Journal White
Twine
Stapler
Sequins


Materials: Elizabeth Craft Designs, Prima Marketing, Ranger, American Crafts

14/08/2017

Enjoy your day - GDT Elizabeth Craft Designs


Moikka and great start to the new week! Yesterday I shared my first piece as a guest to Elizabeth Craft Designs this month and today I share the second one. It's a card using the same techniques as I used in the layout. This card can be given along with a candle or two or just sent to make someones day!

If you checked out the step by step yesterday, you noticed that I took those while working on the layout. Like always, you can use the same steps to make a card or other kind of project, not just a layout. There's the alcohol ink background, the stenciling, the stamping, the golden dots there. And there's also the golden leaf as the focal point. If you want to see the step by step, please visit the Elizabeth Craft Designs's blog here (link).

Thank you for your visit today! ...pssst... Don't tell anyone, but even though I love the golden leaves, my favorite thing in these projects are the cork circles! They are so fun! Until next time, maybe I'll play with the cork more!


Materials from Elizabeth Craft Designs:

Pair of Leaves 2 die set
Circle Background die
Honeycomb die
Alphabet 2 Lower Case die
Stage it Stencil - Paisley
Just a Note Clear Stamp Set
Through the Lens - Wood
Thinking About Grand Canyon paper set
Soft Finish Cardstock Sampler Set 1 - Vintage
Soft Finish Cardstock, Dove Grey
Clear Double Sided Adhesive - 3 mm
Clear Double Sided Adhesive - 5x12"

Other:

Prima Marketing: Clear Gesso
Ranger: Alcohol inks Terracotta, Watermelon, Sunshine Yellow
Ranger: Distress Ink Spiced Marmalade
Ranger: Archival Ink Jet Black
Wow Embossing Powder: Metallic Rich Gold Ultra High and Regular
Wow Embossing Powder: Embossing Ink
A Flair for Buttons: Vintage Butterfly flair set
book pages
corrugated cardboard
kraft cardstock
twine and thread
cork sheet
gold glitter gel pen
pencil


Materials: Elizabeth Craft Designs, Prima Marketing, Wow Embossing Powder, Ranger

13/08/2017

Leaves of Gold - GDT Elizabeth Craft Designs


Hello everyone! Sweet Sunday to you all! Today I'm sharing first  of two projects for Elizabeth Craft Designs as their guest. August is still a summer month, but as the schools are starting and the evenings are getting darker, it marks the start of autumn. Not that I have a problem with that, I rather like the beginning of the autumn with the long, warm evenings and the golden light that colors the pine trees to blood red. And the leaves, the colorful leaves that start to turn into red, orange, yellow and gold and then rustle under your step. A wonderful time!


This time I did a layout to celebrate the autumn and also a card using the same techniques. You can see the card already in the original post (link) in Elizabeth Craft Designs's blog or then wait until tomorrow as I'll blog it then.  What the original post also has, is a step by step tutorial on how I made the layout.

Thank you for your visit today! Have a splendid start to the new week, and be safe! 


Materials from Elizabeth Craft Designs:

Pair of Leaves 2 die set
Circle Background die
Honeycomb die
Alphabet 2 Lower Case die
Stage it Stencil - Paisley
Just a Note Clear Stamp Set
Through the Lens - Wood
Thinking About Grand Canyon paper set
Soft Finish Cardstock Sampler Set 1 - Vintage
Soft Finish Cardstock, Dove Grey
Clear Double Sided Adhesive - 3 mm
Clear Double Sided Adhesive - 5x12"

Other:

Prima Marketing: Clear Gesso
Ranger: Alcohol inks Terracotta, Watermelon, Sunshine Yellow
Ranger: Distress Ink Spiced Marmalade
Ranger: Archival Ink Jet Black
Wow Embossing Powder: Metallic Rich Gold Ultra High and Regular
Wow Embossing Powder: Embossing Ink
A Flair for Buttons: Vintage Butterfly flair set
book pages
corrugated cardboard
kraft cardstock
twine and thread
cork sheet
gold glitter gel pen
pencil


Materials: Elizabeth Craft Designs, Prima Marketing, Wow Embossing Powder, A Flair for Buttons, Ranger


14/07/2017

Summer Hello card - GDT Elizabeth Craft Designs


Moikka and happy Friday to you! I had the pleasure to be guesting at the Elizabeth Craft Designs blog again this month and I created a double tutorial for the post. You can see the original post here (link). There's a card, this card, with step by step instructions and a layout with a video, which I shall blog here in my own blog tomorrow. Both of the projects feature peachy, warm summer colors and lady bugs! And naturally summer project needs some shine, too, to remind of the glorious the sun. For the glimmer I used the Microfine Glitter.


The background for the projects is done using a GelliPlate, an embossing folder and some acrylic paint. Well, there's watercolors and stenciling, too. It was fun to do a step by step again but I must admit that I actually did the layout first and then turned the same steps into a card! 

It takes just eight easy steps and you can create a card like this. The amount of steps is almost equal when turning the same tutorial into a layout. Naturally the surface is a bit bigger, at least if you're working on a 12x12" sheet, but otherwise the steps are the same. First adding the acrylic paint, then the watercolors and so forth. If you wish to see the tutorial, please visit the Elizabeth Craft Designs blog (link).

Thank you for popping in today! Wishing you a pleasant weekend! 


Materials from Elizabeth Craft Designs:

Bouquet embossing folder
Soft Finish Cardstock Sampler Set 1 Vintage
Stage it Stencil Flower
Just a Note Clear Stamps
Thinking About You Rio de Janeiro
Leafy Branch 3 die
Silk Microfine Glitter Light Gold
Bunch of Flowers 4 die set
Lady Bug Quartet Red Rubber Stamp
Clear Double Sided Adhesive 3mm
5x12" Clear Double Sided Adhesive
Alphabet 2 Lower Case die
Soft Finish Cardstock White

Other:

acrylic paints
GelliPlate: Mini Shaped Plates
Prima Marketing: Watercolor set Tropicals
Ranger: Distress Ink Spiced Marmelade and Picked Raspberry
Ranger: Archival Ink Jet Black
A Flair for Buttons: Watercolor Designs 1 flairs
half pearls


Materials: Elizabeth Craft Designs, Ranger, GelliArts, Prima Marketing, A Flair for Buttons


Related Posts Plugin for WordPress, Blogger...