18/11/2019

Tin foil heart - Savvy Supply School challenge ATC


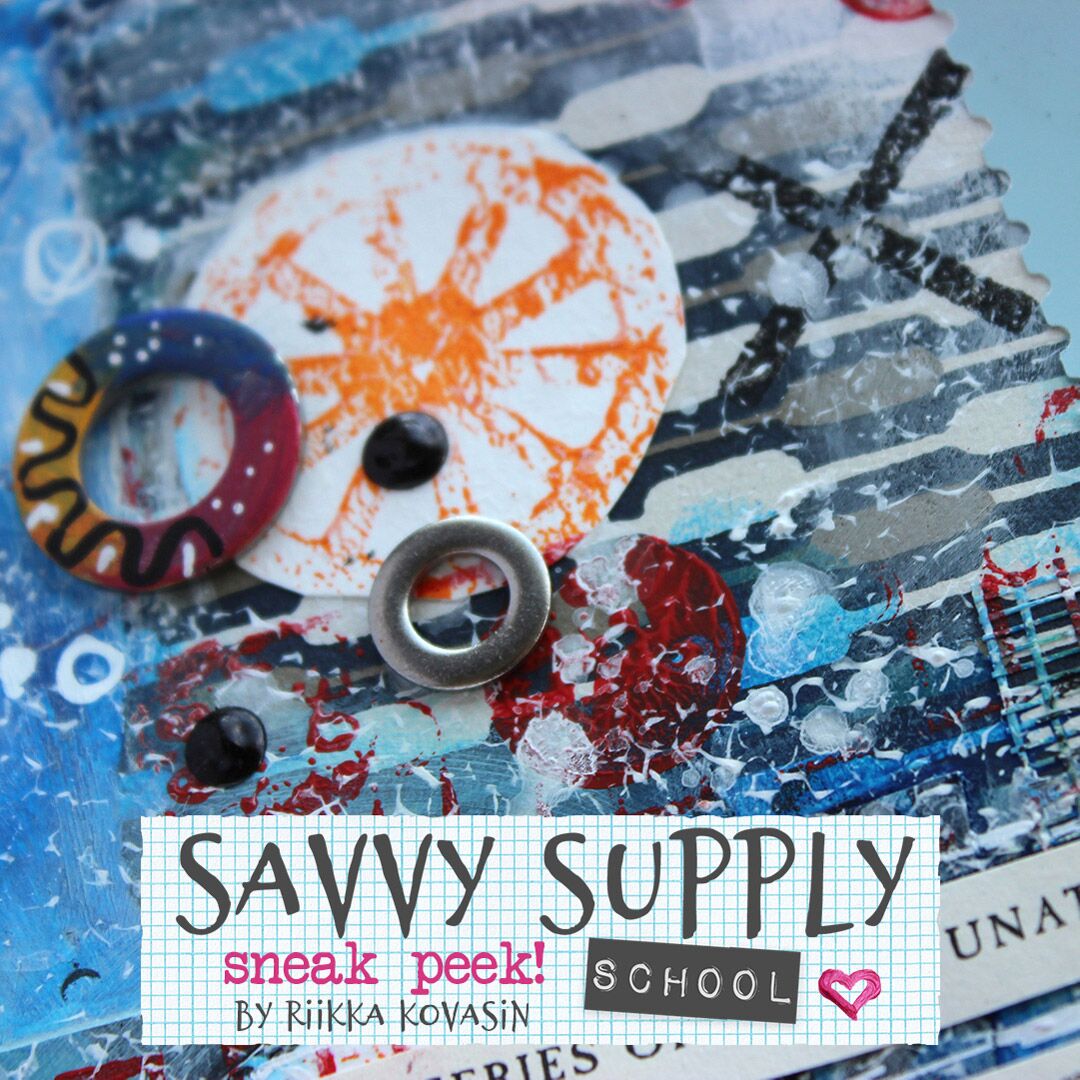
It's Monday! Today I'm sharing the third and last ATC I created for the Savvy Supply School challenge! I hope you have joined in the fun as the prizes are really great! If you'd like to learn more about the workshop and challenge, please see this earlier post (link)

This ATC was shared at Mixed Up Creatives Facebook group on Friday (link). It's again a simple, fun technique using household item and acrylics. You can see the video here (link).


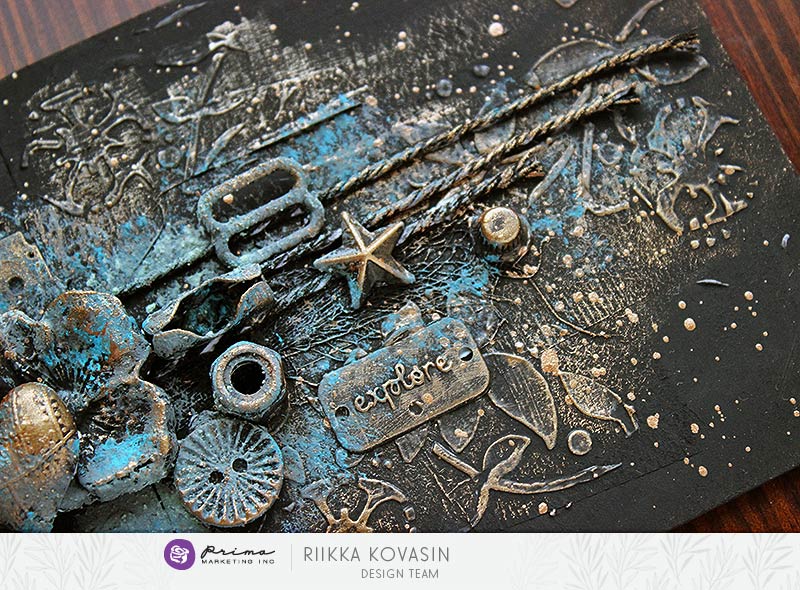
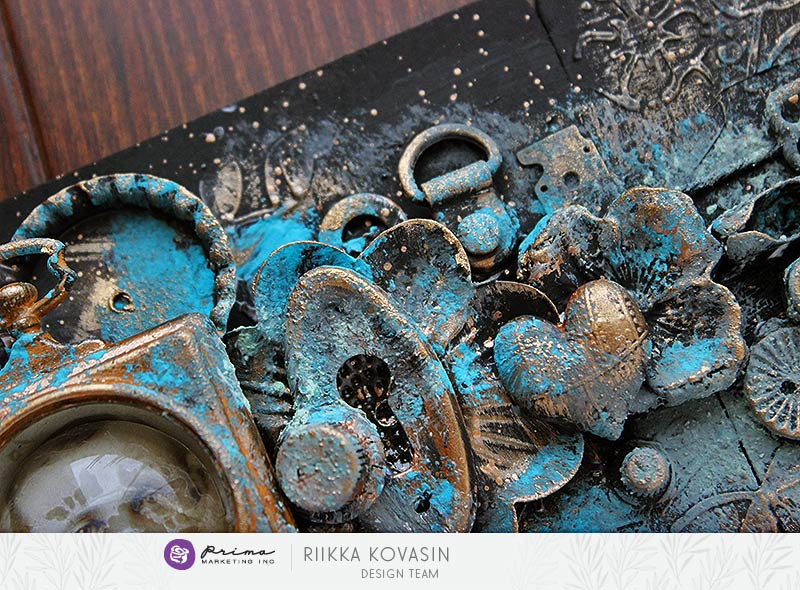
I’ve used this trick with either kitchen foil or aluminium tape so long that I’ve forgotten where I first caught the idea. I think it’s connected to the early days when I started crafting and saw a Tim Holtz embossing folder with a riveted metal sheets kind of pattern. I didn’t have a die cutting and embossing machine back then, so, I started to think how to get the look without the folder and machine. My father is a carpenter and a diy person, so we had some aluminium tape at home. I soon realized that when you push a hole to the surface and add paint on top, the look is somehow similar to the riveted plate even though the direction is opposite. 

In this technique a touch of elasticity is required. The material you are patterning needs to give in a little so you can draw the lines of the plates with a grill stick or a knitting needle. You also need the material to be soft enough you can puncture the rivet holes to it. That’s why I used a piece of cardboard instead of a piece of cardstock in this card.

The last touch to the surface in this technique comes from the black paint. Without it the holes look just holes and the surface is usually looking too shiny. When you add the paint on top, let it dry for a while and then wipe some of it away, you are tricking the eye to believe the surface to be something it’s not. The look transforms into old and worn with a simple addition of colour!

Thank you for stopping by today! If you haven't already, get your spot to Savvy Supply School early enough as the seats are limited! You can purchase the workshop here (link) and please use the code RKSSS20 to get a 20% discount! And please join in the challenge as well, you still have some time! 

Have a great start to the new week!


Materials: Prima Marketing

15/11/2019

Mary turned her head around - Savvy Supply School challenge ATC


Hi and lovely Friday! I'm currently away attending Suomen Kädentaidot and hoping to see you there, but if you are unable to attend the event in Tampere, you can at least join to the Savvy Supply School challenge! Here's a sample ATC I created as inspiration and was shared on Wednesday at Mixed Up Creatives Facebook group (link). If you don't know what challenge or what "Savvy Supply School" I'm refferring at, please see this post about the workshop and challenge (link)

Some years back I would have introduced myself as a mist girl, but since then I’ve changed my preference. Nowadays I grab watercolours if I want a pool of colour to a project, but if I want to layer and play, I choose acrylic paints. There’s a huge selection of paints available with different prize categories. If you are starting as a crafter and don’t need to worry about the light fastness, for example, the craft quality paints are perfect! They are usually affordable, nicely pigmented and have a lovely consistency for painting. 


The acrylic paints are also very versatile. You can mix your own colours, use them in mark making and apply them using different tools. Just by using different brushes or a small brush and your fingers, you can achieve wonderful effects. And if you add a gel medium to the mix – what a world you can conjure! 

In this card I used the main mediums of the workshop (link) such as acrylic paints and black marker and added only two things I hope you can easily find. The other is a wide, clear packaging tape and other old book page. You can replace the tape with a narrower one or with a piece of sticky-baked plastic. If you don’t have book pages, on the other hand, you try with a piece of newspaper or even an add!


In case you haven't joined the challenge yet, here's a link to the Vimeo post about this ATC (link). As you can see from the picture above, the prize is an awesome one! Not only you get a bunch of wonderful products but also a spot in the workshop!

Thank you for stopping by today! Please, consider joining the challenge here (link)! You have until November 23rd! And naturally, get your spot to Savvy Supply School early enough as the seats are limited! You can purchase the workshop here (link) and please use the code RKSSS20 to get a 20% discount! 

Have a great, inspiring weekend! 


Materials: Prima Marketing, Varalusikka 

14/11/2019

...and closer still - Savvy Supply School challenge ATC


Hi there! A couple of days ago I wrote a lengthy post about a new workshop starting on January 2020 and mentioned that it also holds a challenge. I'm referring to this post about Savvy Supply School (link)

The challenge has now been running for four days and this one was the first ATC shared on Monday. If you haven't joined in yet OR seen the video, you can do so here (link) at Mixed Up Creatives Facebook group or see the video here (link) at Vimeo


Acrylic paints are quick to dry. The drying time differs due to the place you live, the surface you are using and the thickness of the layer, but overall, they usually dry very fast and allow you to make quick layers. If you want more “open time”, that is, to enable the paint to dry more slowly, you can add different extenders to the paints. But another fun way to play with the drying time is just to add water in some places while others stay dry. To try this out you don’t need anything but acrylic paints and water. If you happen to have a heat tool and a water mister, all the better!

In the video I show this technique that results a fun, layered look. The colour shades you use effect greatly to the appearance of the final piece. Here I used a teal together with two colours of oranges – one more yellow than the other – and the final piece looks like a corroded or rusted metal.

Thank you for stopping by today! Please consider joining the challenge here (link)! And naturally, get your spot to Savvy Supply School early enough as the seats are limited! You can purchase the workshop here (link) and please use the code RKSSS20 to get a 20% discount! 


Materials: Prima Marketing

13/11/2019

Blooming branch - a painting


Hello there! Thank you for stopping by today! I'm sharing a painting I did for an upcoming demo today. If you rather read the info in Finnish, please scroll down - suomeksi lisätietoa alempana! 

This coming weekend is Suomen Kädentaidot event in Tampere, Finland. It's the biggest craft and design event in Finland with over 700 exhibitors displaying their selection. You can read more about the event here (link)

I've been demoing in the event previously. Last year was my first year with Sinelli and this year I'm at their stand again. This time I'm showing a technique you can use to turn EVA foam into dimensional flowers. I also use it to make stamps and probably try gel printing as well! 

So, if you happen to be in Tampere next Friday to Sunday, please attend the event and stop by the Sinelli booth to say hi! The stand is C 801.

Thank you for stopping by! Wishing you a wonderful Wednesday!


Moikka ja kiitos kun poikkesit blogiini tänään! Tänään bloggaan tällaisen taulun, jonka tein tulevaa demoa varten Suomen Kädentaidot -tapahtumassa. Tapahtuma on tulevana viikonloppuna Tampereella. Viime vuonna näytteilleasettajia oli yli 700! Lisätietoa tapahtumasta ja aikatauluista löytyy täältä (linkki)!

Olen ollut messuilla demoilemassa aika monena vuonna. Viime vuonna olin ensimmäistä kertaa Sinellin ständillä ja siellä tänäkin vuonna. Toivottavasti viime vuosi ei toistu sikäli että ääni lähtee! Tällä kertaa leikin softislevyn kanssa ja teen siitä kukkia ja leimasimia ja varmaan vähän jotain muutakin tulee touhuttua.

Eli, jos siis olet tämän viikon perjantaina, lauantaina tai sunnuntaina Tampereella, tervetuloa osallistumaan messuille ja moikkamaan! Tai vaikka kyselemään, miten tämä taulu on tehty! Ajattelin tehdä tästä toisintoa pienemmässä mittakaavassa. Sinellin paikka on C-hallissa, 801.

Kiitos vielä käynnistä, ihanaa keskiviikkoa! 


Materials: Sinelli


12/11/2019

Time to Explore - Prima Marketing


Moikka and wonderful Tuesday to you all! Today I'm sharing something I created for Prima Marketing Paste post. As you probably can guess, the post was about different pastes in Finnabair line. If you'd like to see some fabulous creations and three videos (yes, three!), please see the original post here (link).


I love the variety of different pastes in Finnabair line! What ever finish you are after, the line has it! There’s glitter and shine (Unicorn Paste), roughness and texture (Rust Pastes), smooth and lustrousness (Icing Pastes) and effect pastes (Patina Pastes). For this project I went with the Patina set and gave the project an aged brass look.

I used Black Gesso as primer and used it also to create some texture to the project. The gesso also acts as the shadow in the project as I added the Brass, Blue and Mint Green with a light hand. If you want to see how I created the project, please see the video below! 


Thank you for stopping by today! Wishing you a lovely day! 

PS. Have you checked yesterday's post already about Savvy Supply School? If not, look here (link)! And remember code RKSSS20 for the discount! 


11/11/2019

Savvy Supply School


Hi there! It's Monday and start of something cool! While the School starts January 2020, you can already see a little sneak peek in the form of a challenge. This whole week there's a new video tutorial showing some fun technique using basic crafting supplies. But now I'm getting ahead of myself, let's first discuss Savvy Supply School or SSS! There's a lot of info in this post, so maybe make a cup of tea or coffee before you start!


What is Savvy Supply School, you ask. Well, would you like to be more inventive with your crafting, buy fewer supplies and use those supplies in various ways? Savvy Supply School is all about thinking outside the box with your crafting materials and using frugal, found and free resources in your creations! So this 12-week course is not about getting you to buy more but instead trying to make you see your already existing materials in a new way. While there's nothing wrong with buying new materials, have you noticed that some purchases are just left gathering dust? At least I find myself going to my "core" ingredients all the time and maybe leaving some others in the shelves.

Savvy Supply School course includes 26 amazing supply-savvy mixed media lessons from a variety of mixed media teachers. You can see them in the picture below! During the course these teachers use salvaged, recycled, natural, and household objects to make unique art pieces. The workshop will encourage you to work with what you have and use things you find around you to take your art to a more personal and unique place. You don't need special mediums or supplies for this workhop! The team has worked with the basics, so you only need a small kit of commonplace mixed media supplies to take this course! If you are excited already, you can purchase the workshop here (link).


Savvy Supply School is a guided learning programme, beginning on Friday 3rd January 2020 and running for 12 weeks. The course includes membership of an exclusive student-only Facebook group where you can meet your tutors, ask any questions about the lessons, and share your amazing art with like-minded people.

This course has a limited number of seats, to ensure each and every student can get individual attention and advice in our group. All this content plus mentoring in an exclusive group, lifetime access and downloadable content for all lessons, is just £55 - but it's even cheaper if you take advantage of the early bird offer! With the code RKSSS20 you'll get 20% off! The code is valid until November 30th. You can purchase the SSS here (link).


But while the SSS starts on January, you can already join the fun and get a sneak peek of something fun. Savvy Supply Challenge started today, on 11th November and will run five days. These videos are totally free! Between 11-15 November we, Mixed Up Creative will be bringing you five video tutorials where we share how to get more from your acrylic paints by using them alongside some common household materials!

Over the week, we'll will create five fabulous ATCs (Artist Trading Cards) - miniature creative words measuring 2.5 x3.5 inches. We’ve kept the processes simple and the designs small so that each class will only take you a few minutes, but if you’d rather create journal pages, tags, cards or anything else – go for it!

Here’s how the challenge will work:

* Each day from 11-15 November we will send you a new project via email and we will also post that project in our Facebook group, Mixed Up Creatives. Challenges will go live at 11 am UK time.

* Share your creations inspired by the challenge in our Facebook group – there will be an album for each day of the challenge.

* At the end of the challenge you can (optionally) swap your ATC cards with up to three other people in the Facebook group.

A challenge would not be complete without some prizes! One lucky participant picked at random will win a place on Savvy Supply School and a selection of fabulous mixed media supplies, from great brands like Golden and Caran d'ache! Plus our favourite entry will win a course of their choice to the value of £20!

The aim of the challenge is to show you some easy techniques that are inexpensive and fun to do. The challenge will give you a little taster of the philosophy behind our new Savvy Supply School, which is all about exploring frugal, found and free art supplies. This challenge is just to dip your toe – our course will have much more in-depth content but still using only commonplace mixed media supplies and plenty of imagination!


The first challenge is now open already, it's a fun, easy technique with just acrylic paints and water! You can see the technique from the Facebook group (link) or from the Mixed Up Creative Academy main Facebook page (link)

And don't forget to enroll early as places are limited! You can purchase your spot here (link) and remember to use the discount code RKSSS20 to get 20% off!

Thank you for stopping by today! A LOT of text in today's post, hopefully you managed to read it all! 

08/11/2019

A flurry of cards


Hi and happy Friday! Here's a flurry of cards I'm demoing tomorrow in a local craft store using their selection of materials. There's some easy ones, some a bit more difficult and some using materials that are maybe not so familiar to the people coming to the shop. 

With these photos I'm wishing you a sweet start to the weekend! May it be a crafty one! 

Heippa ja iloista perjantaita! Ylhäällä on kokoelma kortteja, joita demoilen huomenna lauantaina Simonkadun Sinellissä Helsingissä. Osaan on ohje yrityksen nettisivuilla, osaan ei. Koetin keksiä hiukan erilaisia niillä materiaaleilla, joita Sinellistä löytyy. Tervetuloa tutustumaan! 

Kiitos, kun kurkkasit! Ihanaa alkavaa viikonloppua!


07/11/2019

Scandi decorations - Sizzix


Hi there and lovely Thursday! The Christmas season has definitely started as there's decorations in the shops, chocolate boxes in grocery stores and today the first snow fell to Helsinki as well. To get myself into that holiday and winter mode, I made some decorations using Sizzix dies. 

These decorations were inspired by the "Christmas Elements" die set. I thought pieces of wood would fit them nicey as the background. Only that they aren't real pieces of wood but instead made with "Tree Rings Mini" die and embossing folder set out of EVA foam. I first used the die to cut the shapes, then embossed them using the folder and then painted using acrylic paints. Even making the hole to the decorations was easy as I didn't need a drill but instead could use a hand punch!

If you are looking for more Christmas inspiration, Sizzix UK (link) has a special Christmas hub opened (link)! There's also even bigger source site called "Winter Wonderland" (link) that hosts a competition as well. There's an elf hiding in the Sizzix UK site, but to make locating him easier, this page (link) has a clue where he's hiding. So, click to the site, read the clue and be in for a chance to win some great prizes! 

Thank you for stopping by today! Wishing you a beautiful day! 


Materials from Sizzix: 


06/11/2019

Saint gesso - Finnabair Ambassador spotlight


There's a new blog series starting at Finnabair's blog. It's called Brand Ambassadors' Spotlight. Each month one of the Brand Ambassadors of Finnabair will choose a color, a theme, a product or something else as a focus. Then a couple of Ambassadors will create based on that focus to show you how to be inspired and share interesting techniques and ideas.

The topic of the first spotlight is gesso and the host is Tusia Lech. I think that she chose a perfect medium to start with! It's a wonderful primer but you can use it to so many ways! Just take a look at other Ambassadors' projects in the original post. You can see the original post here (link).


Gesso was my gateway medium to mixed media. I still remember my first little gesso jar, I guess it was about 50 ml and I used it mainly to white splashes. But then one afternoon, about nine years ago everything changed. I realized that I could use mediums with a heavier hand as “it’s only paper”. I was mainly doing scrapbook layouts then and the thought hit me. If I ruin the paper with mediums, the memories are still preserved in my head and the photo is one of the last things I add. So, I decided to lose fear and went for it! I’m still continuing on the same road. 


As you know, gesso is so much more than just white splashes. Naturally, it’s good for that, too, but you can conjure up different things with it. Originally, it’s a primer, used to make a surface for the painting preventing the colorants being absorbed into the canvas and turning the surface unicolor and ideal for paints to get a grip. Because most gessos nowadays are acrylic based and they rather stick to the surface than absorb into it, you can even create texture and relief layers with it. 

For this project I used gesso as the primer, as I was working on wood, but I also transferred the lady’s face using white gesso. It’s similar to gel medium transfer, just another kind of medium for it. First you need to paint a layer of gesso, add the laser printed image on top printed side down and then smooth the image to gesso. Then comes the tedious time to let the gesso dry thoroughly and after that you can rub the paper away using water and your fingers. I also used gesso on top of the embellishments. Some I treated more heavily, turning the piece into white, priming it with gesso, to others I only added some dry brushed hints of white. The raised floral pattern on the sides of the piece are also done using gesso.


My inspiration to the colors and patterns in the project was partly icons, the religious pieces of art, and a mosaic of Theodora, an empress of Eastern Roman Empire. The mosaic in question is from basilica of San Vitale in Ravenna. I first saw the photo of the mosaic in my history book a long time ago, but its strong visual form has since been stored in my brain.

Thank you for stopping by today! I wish my project has inspired you to work with gesso!


Materials from Finnabair: 

Art Basics Heavy Gesso White
Art Basics Soft Gloss Gel 
Art Basics 3D Gloss Gel
Art Alchemy Liquid acrylic paint Deep Turquoise, Ultramarine, Avocado Green, Burnt Sienna 
Art Alchemy Metallique wax Vintage Gold
Mechanicals Woodland Leaves
Mechanicals Metal Lotuses 
Mechanicals Flowers 
Mechanicals Roses
Mechanicals Numbers
Mechanicals Mini Numbers 
Passiflora stencil
Fairy Garden mould
Gothic Book clear stamp


Materials: Prima Marketing, Sinelli


Related Posts Plugin for WordPress, Blogger...