Showing posts with label starting point. Show all posts

18/07/2012

Starting point - Hoodie


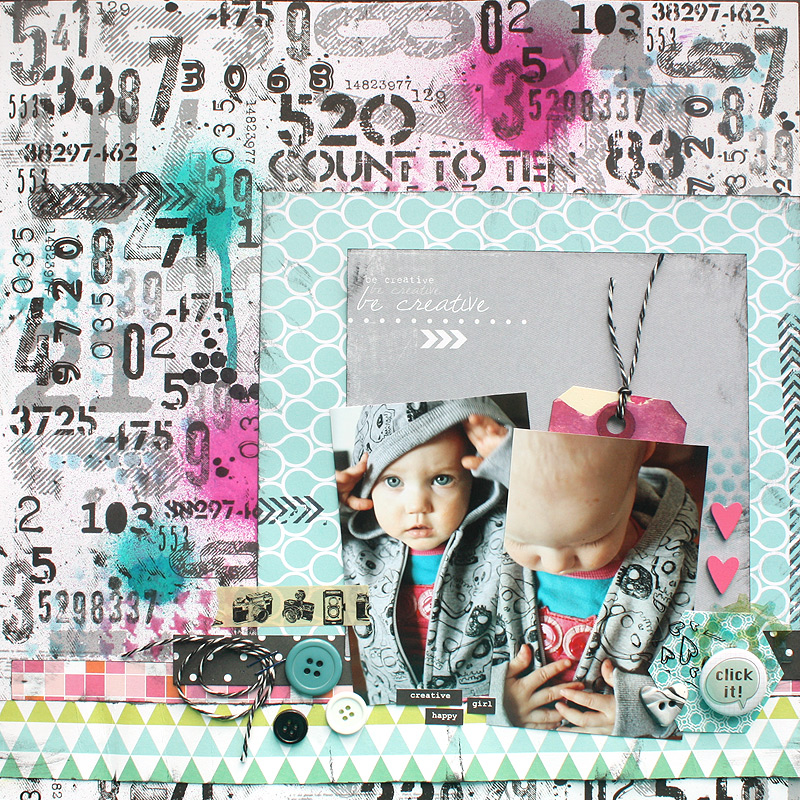
Tällainen sivu syntyi Shimellen tämän kertaiseen "Starting Point" -haasteeseen. Itse en ole pitkään aikaan tullut käyttäneeksi noin isoja paperipintoja, joten tämä oli aivan ihanaa vaihtelua ja sai taas inspiraation virtaamaan. Pitää mitää mielessä se, ettei kaikkia papereita tarvitse suikaloida ihan miniksi.

SODAliciouksen "Count to ten" -paperi sopi näihin kuviin ihan täydellisesti! Suihkin paperiin hieman Dylusioneita ja annoin valua. Sitten tuputtelin mustetta sablunan läpi sinne tänne. Kerroksia loin ColorConspiracyn, ILSin ja SODAliciouksen papereilla. Jokaisen paperin reunoja käsittelin mustalla mustella, jotta paperit sopivat paremmin rouheaan tunnelmaan. 

Tarinointi löytyy esiin vedettävästä tagista ja otsikon jätin kokonaan pois, koska se tuntui turhalta eikä enää sopinut minnekään. Koristeina on muutama nappi, washiteippiä ja Findingnana-nimiseltä merkiltä Etsystä ostettu nappi. 


I made this for current "Starting Point" challenge by Shimelle. I haven't used such a big pieces of papers for a while, so I was really inspired by the starting point! Need to remember from now on, that I don't have to cut every piece of paper to a mini size, but to keep some of them sometimes bigger, too. 

"Count to ten" paper by SODAlicios went together with these pictures just perfectly! I added some Dylusion sprays here and there and let the mist run down the paper. Then I added some ink through a stencil to give the background a bit more layers. The papers used are by ColorConspiracy, ILS and SODAlicious. I treated the edges of every paper with black ink to make them go better with the over all mood of the layout. 

The journaling is in the tag behind the photo. I left the title out completely, because the layout didn't seem to need one and also because I couldn't find a place for it. The decorations include some buttons, washi tape and a button from Findingnana at Etsy. 


24/05/2012

Taiteilija / Artist


Tuonne Paperiliittimen Naamakirjaan jo postasinkin, että olipas innoittava asettelu Shimellen Starting Point -haasteessa. Tässä oma tulokseni aloituksesta. Hiukan muistin tuon alareunan kerrokset väärin, mutta eiköhän se silti haasteeseen käy. Haasteellista tässä sivussa oli myös väri - minä en oikeastaan ikinä käytä lilaa! Kuva kuitenkin vaati ehdottomasti lilaa parikseen, niin mikäs siinä.

Aloitin sivun työstämisen tekemällä tuon maalatun osuuden. Suihkuttelin lilaa Glimmer Mistiä valkoiselle paperille ja perään hiukan keltaista sinne tänne. Lisäsin myös keltaista mustesuihketta. Lopputulos oli aivan liian vahva, mutta ei hätää - gesso pelastaa! Tein paperille siis pikaisen "gessopesun" ja johan näytti hyvältä. Ennen kuvien kiinnitystä roiskaisin vielä samaista lilaa mistiä kontrastia antamaan. Kontrastin takia laitoin myös otsikon mustalla, vaikka ensin ajattelinkin tehdä senkin lilaksi.

Koristeet ovat tässä sivussa varsin minimaaliset. Puusydämet ovat päässeet taas kehiin, kuinkas muutenkaan, mutta niiden lisäksi on vaan pala stanssattua kehystä, Polkkaponin nami nappi sekä "pakollinen" lankasyherö, tällä kertaa olevinaan klemmarilla kiinnitettynä. Ei ihan perinteistä tyyliäni tämä sivu, mutta tykkään.


I posted to Paperiliitin's Facebook page that I found this Shimelle's Starting Point really inspiring. Here's my layout using the same starting point, although I remembered the places of the little cards at the bottom a bit wrong. There was another challenge creating this page, too. I hardly ever use purple! But this time the photo demanded some lilac, so I just had to tackle that colour. 

I begun working with the page by creating that painted piece of cardstock. First I sprayed some lilac Glimmer Mist on the paper and then added some yellow mist and a ink spray I've made myself. The end result was far too contrasting and dark. But no worries - gesso to the rescue. I added "a gessowash" to the surface and the background was just perfect! To add a bit contrast I added some flicks of that lilac mist on top of the papers and choose to use black letters instead of lilac ones I first though of using.

The embellishments are quite minimalistic in this LO. I only added a few wooden hearts, a pice of die-cut frame and a cute button by Polkkaponi. Not my usual style, but I like the end result!


04/04/2012

Starting Point


Myöhäisherännäinen tässä hei! Shimellen blogista on ollut juttua jo monessa paikassa, mutta minä päädyin tutkimaan tuota inspiraation aarreaittaa vasta eilen. Sattuipa siellä olemaan sitten niin inspiroiva "Starting Point" että pakko siitä oli lähes samantien tehdä sivu. 

Tämä leiska on yhteistyön tulos. K on jo pidemmän aikaa selittänyt tekevänsä "skräppijuttuja", joten minusta oli vain luonnollista antaa hänen maalata yksi skräppileiskan pohja. Samalla kun tyttö työsti sivua, napsin kuvia. Kuivuttuaan pohja sai odottaa laatikossa aika kauan, kunnes teetin kuvat. K siis maalasi gessotetun pohjan päälle akryylimaaleilla. Kuivatin maalia kuumailmapuhaltimella ja "keitin" sitä sieltä täältä - idea on Nathalielta. Maalin päälle suihkun vielä hiukan mistejä - maskatut kukkaset eivät enää kerrosten alta näy, mutta mikäs siinä.

Koska en halunnut peittää täysin sitä, mitä tyttö on tehnyt, valitsin tuoksi suurimmaksi "paperiksi" Hamblyn kalvon. Luonnossa kun siitä näkee hyvin läpi, mitä pohjassa on. Lisäksi liimasin kalvon kiinni vain tuolta oikeasta ylänurkasta, joten halutessaan sen alle voi vielä vaikka kurkkiakin. Muut käytetyt paperit valitsin maalien värien mukaan - turkoosia ja vihreää. Halusin paljon kuoseja, joten jokainen on erilainen. 

Paperien paikalleen asettelun jälkeen lisäsin kuvat, sitten koristeet. Rakensin tuollaisen viirinauhan washiteipistä ja lisäilin teippejä muutenkin sinne tänne. Leipurinnyöriä, kukka ja sekalainen satsi nappeja pääsi myös sivuun. Tarinointiliuskat lisäsin viimeisenä.

Mieheni oli tästä sivusta kovin ylpeä, sillä se ei ole alapainoinen - niitä näet useimmiten hänen mielestään teen. Heh.


I'm noticed  links to Shimelle's blog quite a while now, but only yesterday clicked myself for a visit. What a treasure chest of inspiration! The first thing I saw was this "Starting Point" which inspired me so much, I needed to do a layout right away. 

This layout is a result of collaboration. My older daughter, K, has been doing "these scrapbook things" for a while now, so I thought it would only be natural to let her paint a paper for me to use for a layout. While she was busy with the acrylic paints, I took a few photos and decided to use them in the page. I dried the paint with heath gun, "cooking" the paint - the idea is from Nathalie

Because I didn't want to completely cover my daughter's work, I choose to use a transparent by Hambly in the place for the largest paper. I'm not sure if this is allowed, but I'll link my work anyway. The transparecy is also glued to the background only from the upper right corner, so you can take a peek underneath it, too. The other papers I chose to match to the paint colors, turquoise and green.

After placing the papers in place, I added the photos and the decorations. I made that streamer using masking tapes and added the tapes here and there, too. There's also baker's twine, flower and some buttons in the page. The journaling strips were the last ones I added.

My husband is really happy about this page. He thinks my layouts tend to be "bottom heavy", so this layout is like a breath of fresh air for him. ;)


Related Posts Plugin for WordPress, Blogger...