31/07/2020

Among Stars - Prima Marketing Facebook Live


Moikka! It's time to announce my last Facebook live for Prima Marketing as I'm not applying to another term. It feels so strange as I've been a part of the DT several years and done the Facebook lives quite a while, too. 


For my last Facebook live I went playing among the stars. During the live I’ll make a small assemblage and use both “Unicorn” and “Golden Nugget” pastes in that to create a galaxy look. While I work on top of black surface, to get that galaxy effect, the same techniques apply to light surface as well. I made a sample with the same techniques on a white surface, too, and shall blog that on Monday and naturally show it during the live show, too.

If you wish to create along side with me, there's a materials list of Prima mediums and elements I'm using. On top of those, I'm using a small wooden base, some wire, tea, bees wax and a metal tea light cup.

Hope you can join me next Tuesday! Thank you for stopping by today! Have a nice weekend!


Materials: 

966935 – Art Extravagance Golden Nugget paste 
966942 – Art Extravagance Unicorn paste 
961459 – Art Alchemy Heavy Gesso Black 
961442 – Art Basics Heavy Gesso White 
967741 – Art Alchemy Sparks acrylic paint Chest of Gold 
964450 – Art Alchemy Metallique acrylic paint Midnight Sky 
965143 – Art Alchemy Metallique acrylic paint Royal Blue 
964436 – Art Alchemy Metallique acrylic paint White Pearl 
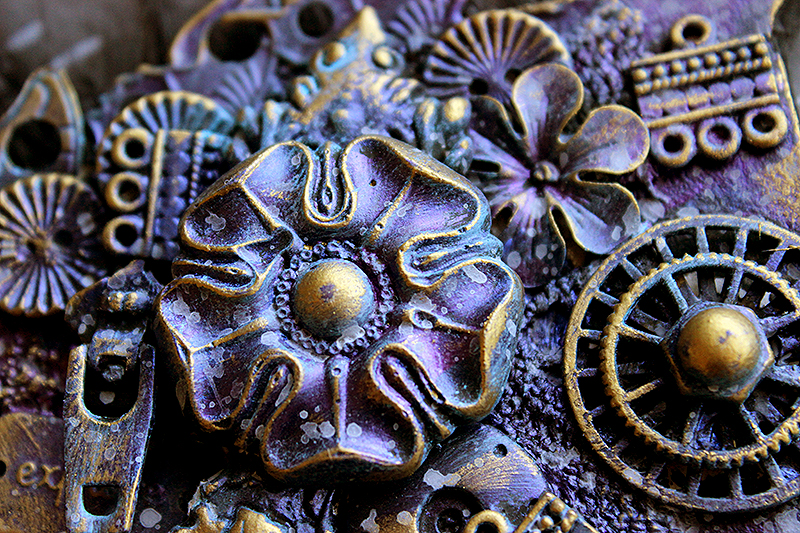
963392 – Finnabair Mechanicals Barn Stars 
963354 – Finnabair Mechanicals Mini Stars 
967109 – Finnabair Mechanicals Machine Parts 
967086 – Finnabair Mechanicals Antique Labels 
967093 – Finnabair Mechanicals Hardware Accents 
963316 – Finnabair Mechanicals Mini Hardware
961596 – Art Ingredients Luminous glitter set 
963958 – Art Alchemy Metallique wax Vintage Gold 
964948 – Art Daily Planner sticker book Words You Need 
966287 – Art Ingredients Melange Art Pebbles Sugar 
Finnabair stars stencil


Materials: Prima Marketing, Sinelli


30/07/2020

Priceless Keepsakes - Craft Stamper


Hi there! I shared a little bag yesterday (link) and stated it was first of two projects I made for Craft Stamper June 2019 issue. Here's the other one - a cover for a notebook or a traveler's notebook. This one I made with a step by step tutorial for my "Paper Patchwork" article in the magazine.


Like with the bag, I created first a patchwork styled background using a Gelliplate, some stencils and stamping. Then I turned the piece of leather paper into cover for the notebook and finished the embellishing using a stamped and embossed image.

Thank you for stopping by today! Underneath is a picture of the two projects. 


Materials: Prima Marketing, GelliArts, Posca, 7 Dots Studio, WOW! Embossing Powder, Sizzix


29/07/2020

Saturday, Sunday, Monday - Craft Stamper


Hi there! Here's the first of two projects I created way back for Craft Stamper's June 2019 issue. The topic of my "Paper Patchwork" article was leather paper. You can have a small glimpse on the article here (link), on Craft Stamper site.

Like I said earlier, I made two pieces for the article - this little bag and then a notebook cover with a step by step tutorial. The technique in both is the same - using a grid design to mimic patchwork on top of the leather paper. For the first layer I used a small GelliPlate and then added patterns on top. 


I'm sharing the other piece tomorrow, but if you're eager to get a sneak peek try either that link on top of the picture below.

Thank you for stopping by today! Wishing you a colorful day!


Materials: Prima Marketing, Posca, WOW! Embossing, Sizzix, GelliArts, Ranger


28/07/2020

Postal tags - 7 Dots Studio


Hello! Today I'm sharing a couple of tags I made for 7 Dots Studio. For these two I drew inspiration from the Airmail collection, but as usual, mixed in several others. My other inspiration came from the different tags and I ended up using them to make my background, backing my focal point and even adding two to the foreground as kind of a sentiment.


I started the tags by adding the adhesive chipboard tags to a dark sheet “Lonely Evenings” from the Cold Country collection. This created a dramatic effect to them. On top I then layered die cut tags from a couple of collections and topped those with circle stickers. To highlight the circles, I used both a soft pencil and a black watercolor pencil. If you want to see how I made the tags, please see the video above!

Thank you for stopping by today!


Materials from 7 Dots Studio:

Cold Country – Lonely Evenings 12x12
Airmail – Scripted 12x12
Writer’s Block – Tags 12x12
Nature Walk – Tags 12x12
Hazy Days – Tags 12x12
Lost and Found – Tags 12x12
Hopefully – Tags 12x12 
Airmail – Element Stickers 6x12 
Garden Party – Element Stickers 6x12 
Fortune-teller – Elements Stickers 6x12 
Writer’s Block – Die-cut Elements 6x12 


Materials: 7 Dots Studio, Ranger, Prima Marketing 


27/07/2020

Be joyful - WOW! Embossing Powder


Hello there! A new week and a set of new posts to come! I'm starting the week with a sample card I made for WOW! quite some time ago. It's done at the same time as the other card I blogged last Friday. 

In this card I was mainly playing with the two new ways to apply embossing ink - the Freestyle Tool (link) and the Mixed Media Embossing Brush (link). Both are like little lip gloss looking containers, but the other one has a brush and other one a ball to apply the ink. The swirls in the black cardstock are done using the Freestyle Tool and the green leaf is colored with embossing powder using the Mixed Media Embossing Brush. 

Thank you for stopping by today! Wishing you a wonderful start to the new week!


Materials: WOW! Embossing Powder, Carabelle Studio, Varalusikka


24/07/2020

You're The Zest - WOW! Embossing Powder


Fri-yay! Have you got special plans for the weekend? Maybe some crafting? I'm sharing this little card I made back in the beginning of the year to WOW! Embossing Powder. Or it might have actually been the end of last year, in fact. 

You probably can't see the beautiful bling the card has from the "Gemstone" set. All the three powders in this Trio are embossing glitter. I thought the color palette of these precious stones went nicely together with the WOW! stamp set "Fruit for Thought". Like there was yellow for lemon, red for strawberries and green for pears! A prefect match. The colors and shapes together made me think about the hard candies my grandparents usually brought back when they went for a cruise - Monpensiers Fruit Drops.

Thank you for stopping by today! Remember, you are the zest! Have a great weekend! 


Materials: WOW! Embossin Powder, Ranger


23/07/2020

Sun, moon and stars key chains - Prima Marketing


Moikka! Today I'm sharing a little something I made for Prima Marketing for a gift themed post.

When thinking about what to do, I first decided to rule out cards and canvases. While a handmade card with cookies or candies makes a perfect gift, I wanted to do something different as I craft cards and canvases to other, not gift themed posts. Instead I wanted to do something with a purpose. After some pondering I settled upon some keyrings. They are handy, little items with a purpose, and you can craft them in such a variety of styles and ways! 


I typed the steps I took to make these three in case you want to create something similar! 

Step 1. Form the wooden pieces into small houses. Paint the pieces with Impasto paint and let dry.

Step 2. Trace the shape of the house to a sheet of Pretty Mosaic paper. Cut loose a little smaller than the drawing. Use Soft Matte Gel to collage the papers to the houses. Let again dry. 

Step 3. Add some stamping on top using black permanent ink and a script stamp. At the same time stamp the moon and the sun embellishments to white cardstock. Color the embellishments using “Shimmering Lights” watercolors and then cut to fit under a clear Melange Pebble. Adhere the pebble on top.

Step 4. Add some colors to the tiny paper piece to the front of the house. Mix the two shiny teal acrylic paints and add some sheen to the sides as well. 

Step 5. Add some dimension to the background by using Icing Paste and a stencil. Before the paste is dry, add some extra adhesive to the back of the sun and the moon pebble as well as to the star and push them into place. 

Step 6. Thread some wire through some Glass Beads and a couple of pearls from the Pearls V set. Wrap the wire around the little house. Add an eyelet screw to both ends of the house and some crystals near the focal point from the Pretty Mosaic SIIC set. 

Step 7. Finish the decorative keyring with waxes and add a ring to the piece. You can also add a jump ring first to the eyelet screw and add additional embellishments there. I added some letter beads to dangle from the ring. 


Thank you for stopping by today! Wishing you a splendid day. 


Materials: Prima Marketing, Sinelli


22/07/2020

A black horse ATC


Hello there and splendid Wednesday!Today I'm sharing something special - an ATC I made for Finnabair. Now that the horse has safely reached her destination, I can share it with you. 

Quite a while ago Finnabair and her team had a YouTube hop with free form ATCs. Finnabair did some wonderful steam punk parrots for her cards and I was lucky enough to be fast enough to ask if she'd swap one of them. You can see the parrot video here (link), there's also links to other videos in the hop.


I was ever so happy to have a chance to have a little art piece by her! But then the reality struck - what in earth should I send her?! I pondered and pondered about the card. Quite early on I decided that it had to be a free form one, a traditional one just wouldn't do in this case. But what shape? I didn't want to do a bird even though my first idea was a raven, because that felt too much the same as her birds. Not that I could have done anything like them, but still. 

Then I happened to watch one of her Patreon lives and she mentioned that she likes horses. Ta da, I could do a horse! Or rather, I did a head of a horse, which hopefully isn't too much Godfather styled. I drew a horse shape to a piece of thick cardstock, cut it out, painted it black and started to layer embellishments on top. There's quite a lot of recycled or reused elements in there like a zipper pull and a picture hook. The horse's mane is made out of bristles of a brush.

Even though Jon Oliva's Pain's song "Death rides a black horse" kept playing in my head while I made the horse, probably because it was a black horse then, I wanted it to represent night or night sky. So I chose dark blue, inky blue and purple metallic paints for the first paint layers and added white splashes and touches of gold on top. 

Thank you for stopping by today! Wishing you a magical day!


Materials: Prima Marketing


Related Posts Plugin for WordPress, Blogger...