Happy Friday! Last week I had the privilege of guesting over at Elisabeth Crafts Designs. I felt really honored when they moved the post a bit forward to celebrate National Scrapbooking Day and also made a kit with the same materials which I used in the page! You can see the orinal post here (link) and see the kit here (link).
The topic of the page I made forthe guest spot was my older daughter and the funny hat she is wearing in the picture. The picture is actually taken last Halloween but it also could have been from May Day as my daughter’s preschool had “wear a funny hat” day then.
On top of the photo the inspiration for this page came from the “Ribbons 1” die set as I immediately saw it as a design element in a scrapbooking page. Underneath are the steps I took to make the page.
1. Cut strips of patterned paper using the ”Ribbons 1” dies and 6x6x ”Through The Lens - Wood” pad. Use variety of designs and colors.
2. Use Dove Grey colored Soft Finish Cardstock as background. Think about the placement of the photo and mark it to the page. Cut a piece of the Clear Double Sided Adhesive Sheet and place it inside the markings.
3. Remove the protective layer from the adhesive and layer the “Ribbons 1” strips to the page by adhering them to the piece. Cut the strips shorter if needed. Vary the length of strips for a mixed effect.
4. Add a few lengths of twine in the mix and staple the strips and the twine to the page. The staples lock the layers in place as well as create a lovely detail to the background.
5. Use a palette knife and add some white gesso on top of the existing layers. Especially add some to the cardstock yet not treated otherwise. Dry.
6. Add watercolors on top of the gesso. Use a couple of different colors or shades of the same color. First paint a section of the gessoed area and then add splashes to the whole page. Dry.
7. Ink through the “Flower” stencil by using a similar color of Distress Ink as you’ve used in the watercolors. Go over the already colored area but leave some of the cardstock untouched.
8. Stamp using a couple of stamps from the “Just a Note” set. Go around the area you’ve planned for your photo.
9. Layer some papers from the “Through The Lens – Wood” pad behind the photo and attach the paper cluster as well as your photo with foam dots to create 3D effect to the page.
10. Cut two set of leaves using the “Big Triple Leaf” die and “Through The Lens – Wood” papers. Adhere beside the photo.
11. Cut the set of alphas using the “Alphabet 2 Lower Case” die and a piece of scrap paper. Write the title using the piece as a stencil.
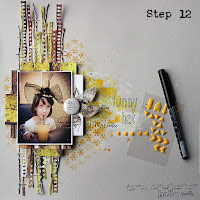
12. Finish the page with some embellishments like a flair button and some stickers. Also write the journaling and add a few little drawings near the photo.
Thank you for stopping by today! Wishing you a lovey, sunny start to the weekend!
Materials list:
Elisabeth Craft Designs:
Other:
Patterned paper (7 Dots Studio – Dreamer – Sleepless)
White gesso (Prima Marketing - Finnabair Art Basics – Heavy Gesso White)
Watercolors (Prima Marketing – Watercolor Confections – The Classics)
Distress Ink (Spiced Marmalade)
Archival Ink (Jet Black)
Black pen (Fude Ball Pen)
Flair button (A Flair for Buttons – Tell Your Story 1)
Epoxy stickers (Doodlebug Designs – Sprinkles – Self Adhesive Arrows)
Foam dots
Twine
Paperclips
Materials: Elizabeth Craft Designs, 7 Dots Studio, Prima Marketing, A Flair for Buttons, Ranger, Doodlebug Designs


2 comments:
Hieno ja hauska! :)
Riikka, beautiful page and design. Your daughter is adorable with her hat!
Post a Comment