
Feathers seem to be everywhere, so I made this tutorial to make them out of washi tape! The same way you can make feathers out of all other tapes. The big see-through feather is made of using packaging tape.
Sulat ovat tällä hetkellä kaikkialla, joten tein tämän pienen tutoriaalin niiden tekemiseen washiteipistä! Samalla tavalla sulkia voi tehdä kaikista teipeistä. Iso, läpinäkyvä sulka on tehty pakkausteipistä.

You will need some wire and washi tapes to make the feather. You will also need scissors and maybe wire cutters if you make big feathers and use thick wire. For the little ones the thread-like version will work fine.
Sulkien tekoon tarvitset rautalankaa ja washiteippejä. Tarvitset myös sakset ja mahdollisesti sivuleikkurit rautalangan leikkaamiseen. Isoihin sulkiin kannattaa käyttää vahvempaa rautalankaa ja pikkuruisiin riittää langanvahvinen.
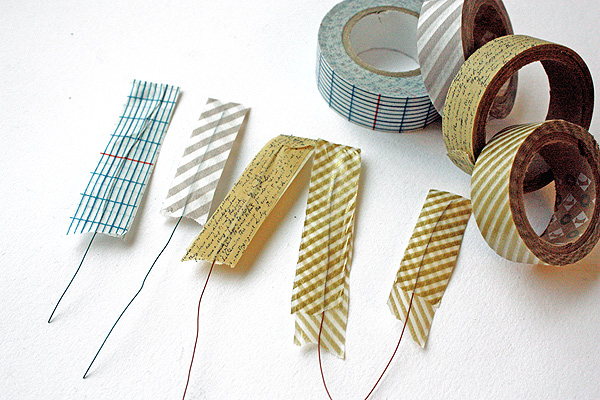
Cut a piece of the wire, for example 7 cm. Then take about 15 cm of the washitape and attach it to the wire. First attach the other half to the wire and then fold it over the wire and attach the sides to each other. The wire should be in the middle of the tape and on the top there should be a part of the folded washi without the wire.
Leikkaa rautalangasta palanen, esimerkiksi n. 7 cm. Ota sitten washiteipistä n. 15 cm palanen ja kiinnitä se rautalankaan. Kiinnitä ensin puolet teipistä ja taita sitten teipin toinen puoli rautalangan pään yli. Kiinnitä puolet toisiinsa. Rautalangan tulisi olla teipin palan keskellä ja teipin kärjessä tulisi olla pätkä pelkkää taitettua teippiä, ilman rautalankaa.

Then reach for your scissors and trim the tape in the shape of the feather. Be careful not to cut the wire! Then add the "texture" of the feather - cut in an angle from the edge of the weater inwards. You can cut as much or as little as you want. Be careful not to cut the wire and on the top of the feather not to cut the feather apart.
Sitten on saksien vuoro. Muotoile washiteippi sulan muotoon. Ole varovainen, ettet leikkaa rautalankaa poikki! Lisää sitten sulkaan sen "tekstuuri" leikkaamalla pieniä viiltoja sulkaan reunasta sisälle päin kulmittain. Voit leikata niin paljon tai vähän kuin haluat. Ole varovainen, ettet leikkää rautalankaa vahingossa poikki tai leikkaa palasta sulasta sen kärjessä.

All done! Then you can add your feathers to your project!
Valmista! Sitten vaan lisäämään sulka korttiin, skräppiin tai muuhun työhön!
These look fabulous!! I can see lots of washi feathers floating about on layouts now. Thanks for a great idea and tutorial!
ReplyDeleteThank you Sandie <3
DeleteKiitos kaunis Riikalle! Tämä menee oitis kokeiluun :)
ReplyDeleteKiitoksia!
ReplyDeleteIhana ohje täytyypä kokeilla!
Kiitos :)
DeleteHienoa ja yksinkertaista. Menenpäs heti kokeilemaan!
ReplyDeleteHienoa :)
DeleteIhania! Kiitos Riikka!
ReplyDeleteKiitos :)
DeleteJei, kiitos! Täytyy kyllä kokeilla!
ReplyDeleteKiitos :)
DeleteJei, kiitos! Täytyy kyllä kokeilla!
ReplyDelete:)
Delete<3 <3 <3
ReplyDeletegreat idea, have to try this , thanks a lot for sharing this :)
ReplyDeleteThank you :)
DeleteGreat tip! Thank you for sharing!
ReplyDeleteMy pleasure!
DeleteTotally awesome....
ReplyDeleteThank you :)
Deletethanks thanks thanks for sharing your inspiring ideas x
ReplyDeleteThank you Heather!
DeleteKiitos! Ehdottomasti tekoon-listalle nämä. Pakko ehkä saada laajentaa wt-valikoimaa ihan näidenkin takia...
ReplyDeleteKiitokset :D Jos valikoimaa laajentaa, suosittelen leveämpiä teippejä, saa isompia sulkia ;)
DeleteThis comment has been removed by the author.
ReplyDeleteThis comment has been removed by the author.
ReplyDeleteWOW!! Thank you so much for sharing!!!
ReplyDeleteVery very cool!
ReplyDeleteThank you :)
DeleteIt's genial!
ReplyDeleteThanks :")
DeleteWhat a great idea!x
ReplyDeleteThank you :)
DeleteThis is awesome, thanks for a great idea!
ReplyDeleteLoistava idea, täytyy ehdottomasti kokeilla!
ReplyDeleteLiity muiden kanssa samaan kuoroon. Mahtava idea!!
ReplyDeleteToo ptetty! I tried to do feathers out of paper, but they did not even look that nice, so thanks for sharing and I will try it :)
ReplyDeleteThank you Jessica <3
DeleteFantastic tutorial! They look so sweet!
ReplyDeleteThank you sandi!
DeleteLOVE it girl!!!
ReplyDeleteThank you Revlie <3
Deletewhat a great idea!! I will sure try this! thanks for sharing
ReplyDeleteThank you :)
Deleteomg! This is just so clever! Thanks for sharing!
ReplyDeleteThank you Michelle!
DeleteAivan ihana keksintö, tätä on aivan ehdottomasti kokeiltava! Kiitos vinkistä!
ReplyDeleteKiitokset :")
DeleteVihdoinkin pääsin testaamaan näitä, oli tosi kivoja tehdä. Sain skräppisivun aikaseksi näillä :) Laitoin kuvan blogiin
DeleteIhana idea ja upea tutoriaali!
ReplyDeleteKiitos! :)
Deleteamazing!! I'm all inspired and off to go and make some of these right now!!!
ReplyDeleteThank you :")
DeleteGorgeous - great tutorial! I went straight to make some and they look fab! Thanks for sharing!
ReplyDeleteThank you Chantalle!
DeleteThank you! very useful!
ReplyDeleteThank you :)
DeleteI wanted to share this.. I added the washi feathers to my layout. Thank you very much for this tutorial it was timely!
ReplyDeletehttp://scraposition.blogspot.sg/2013/02/lets-scrap-feathers-and-bling-challenge.html
Thank you Michelle so much for sharing!
DeleteLoooove!!! I tried it with washi and with stickers, great!
ReplyDeleteThank you, great to hear that my tutorial was useful! :)
DeleteLOVE this!!!
ReplyDeleteThank you :)
DeleteTosi kiva ohje. Tänään kokeilin tehdä itsekin: http://apris-askartelunurkka.blogspot.fi/2013/02/kortiston-haaste-19.html
ReplyDeleteIhana kortti ja iloiset sulat! Kiitokset linkityksestä :)
DeleteUpea idea! Pitääkin kokeilla!
ReplyDeleteThanks...I'm so going to try this!! Love it!! xo Evie
ReplyDeleteThank you for commenting, Evie :)
DeleteVoi, tätä pitää ehdottomasti kokeilla - kunhan reissun jälkeen ostan tuota teippiä....
ReplyDeleteja erityislämmin kiitos todellakin rautalanka-versiosta eli ohjeesta, ei jäänyt mitään epäselvää....joskus joidenkin ohjeet tuntuvat alan taitajille helpoilta, mutta ei-niin-virkeälle askartelijalle se voi olla hepreaa...
Iloa päivääsi!
Suurkiitos kauniista sanoistasi! :)
DeleteI love feathers, I love washi, I must try this! Thank you!
ReplyDeleteThank you for leaving a comment :)
DeleteThis is a wonderful tutorial. Thanks so much for sharing.
ReplyDeleteThank you Karen :)
DeleteWhat a wonderful tutorial! Thank you for sharing this, I can't wait to try it!
ReplyDeleteThank you :) Glad that you enjoyed! :)
DeleteSo clever! Thanks for this fabulous idea, Riikka!
ReplyDeleteThank you :)
DeleteAmazing! Thanks for sharing!
ReplyDeleteThank you for your interest :)
DeleteAbsolutely brilliant idea - so clever, thank you for sharing it :)
ReplyDeleteThank you :)
DeleteWhat an incredible technique! Thanks for sharing it.
ReplyDeleteThank you Janelle :)
DeleteOff to get my washi and scissors! TFS.
ReplyDeleteFantastic tutorial - off to make feathers!
ReplyDeleteThank you Deirdre!
DeleteThank you for this tutorial (discovered via Pinterest), it looks great ! I already made my own feathers and my little boy wanted to learn ;).
ReplyDeleteThank you :)
Delete31 sulkaa valmiina! kiitos ohjeista :)
ReplyDeleteHienoa jos oli apua! :)
Delete